Description
The Nullaki is a new, MID-VOLUME backpack from Wilderness Equipment, a super-economical alternative to the canvas Nornalup. Made from the same materials as the larger volume Outbreak model the Nullaki is otherwise identical to the Nornalup.
The system is deceptively simple yet achieves the same high level of comfort and precise load transfer that Wilderness Equipment packs are known for.
Different size hip harnesses are quickly interchanged if longer or shorter spans are required.
The wings fold up for compact transport in vehicles or equipment stores. Look at the list of features under the specification tab.
This pack is perfect for people of slight build, for multi-day walks of up to three or four days without resupply, and for hut to hut backpacking.
Features:
- Rugged, single-compartment, mid-volume backpack using tough, 1000d bulked-filament nylon Kodra fabric
- Easy access wide-mouth throat, high-cut canvas bag rim and heavy-duty drawcord closure
- Simple fixed back pocket and top pocket
Side bottle pockets with replaceable shock cord rims
- Base panel of the pack bag has built-in closed-cell foam padding for best possible abrasion resistance
Internal water bladder sleeve with Hypalon bag ports
- Strong, easily-selected, dual back lengths on all three bag sizes
- Designed for highest durability and easy maintenance
Bag Fabric and reinforcing Layers: 1000d nylon Kodra, PU coated.
- Colour: Teal Green / Grey
- Internal Frame System: Convert frame sheet with spine bar coupled to an inverted-U tubular aluminium frame at shoulder level
- Shoulder Harness: Fixed to pack bag
- Hip Harness: Convert Perfect-FIT with fixed lumbar pad all with laminated foam padding and built-in HDPE support plates
- Harness Face Fabric: Tough, soft, 640d spun polyester
- To Fit back sizes: XS/S (350/400mm), S/M (400/450mm), M/L (450/500mm)
- Bag Capacities: XS/S: 50L, S/M: 55L, M/L: 60L
- Pack Weights: XS/S: 2.2 kg, S/M: 2.4 kg, M/L: 2.6 kg
Product Details
Material: | 1000d Nylon Kodra, PU Coated, Cotton-Polyester Canvas |
Size in Litres: | XS/S: 50L, S/M: 55L, M/L: 60L |
Weight: | XS/S: 2.2kg, S/M: 2.4kg, M/L: 2.6kg |
Sizing Guide
Choosing the Right Pack Size:
The product specification tables show the range of back length sizes that each Hip Loading backpack model is available in.
You will see the size designations XS, S, M, and L, and combinations of them.
For optimum comfort it is essential that you choose a pack back length size that matches your own back length.
If the design spacing between the hip harness and the shoulder harness on the pack matches your torso length you will be able to carry your pack load with comfort and stability once the usual adjustments are made (see Using Your WE backpack).
It is not possible to properly set-up a pack that is one or more sizes too short for your back. The compromise when the pack is one size too long is not so serious. In any case, don't worry, getting the size right is simple!
The point needs to be made here and now. Do not confuse pack Size with pack Volume!
Whatever your stature or build, if you require a big volume pack then start by choosing a big volume model from our range. If you have a relatively short torso length you will always require a smaller pack back size, whatever the model you choose.
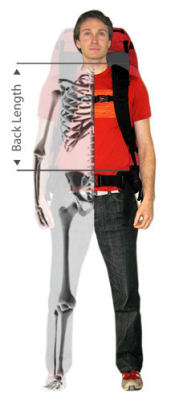
Measure the vertical distance from the crest of your hip bone up to the level of your shoulder surface, where the pack shoulder harness will rest.
Find the top of your hip bone (pelvic crest) on one side.
Hold the end of a tape measure on the bone. It slopes down as you move along it towards the front centreline of your body.
Find a position directly down from a point on the corresponding shoulder at the place where the shoulder harness arm will cross it.
Now, extend the tape measure vertically upwards from the hip bone and, at the same time, rest a ruler or other straight edge horizontally on your shoulder, extending forward from where the shoulder harness padded arm will rest.
If your measurement is above 45cm choose a large size pack.
If it is between 40cm and 45cm choose a medium size.
Between 35cm and 40cm means you need a small.
If your measurement falls below 35cm and the pack model you have chosen comes in a combination XS/S size, thread the shoulder harness top stabiliser straps through the lower pair of buckles, corresponding to the XS back length.
Features:
Warranty
All Wilderness Equipment brand products are warranted, subject to the exclusions stated and explained below, against faulty materials and manufacture for their life. If this product should fail under normal use it will either be repaired or replaced, at the sole discretion of the wholesale Distributor, free-of-charge upon the product's return to the Distributor's warehouse.
Exclusions:
Excluded from this warranty is deterioration of the product due to normal wear and tear, or due to the natural, unavoidable, deterioration of materials with extended use or with the passage of time. To maximise product life it is important to read and follow the advice and warnings provided in instructions for the use and care of the product.
Excluded from this warranty is damage caused by improper use or improper care. Improper use includes all use which, although conceivable, is use that the product could not reasonably be expected to withstand without suffering damage. (For example, damage to a backpack resulting from it being hauled unprotected up a cliff face, or the puncturing of a rainshell resulting from contact with thorny scrub both fall under "improper use". Leaving a product in a damp or wet condition for an extended period of storage will certainly result in irreversible deterioration. Such action constitutes "improper care").
Where a product is sold with a separate consumer warranty provided at the point of sale by a third party then claims relating to the specified components or performance aspects of the product covered by such warranty are excluded. (For example, past products made from materials manufactured by W.L. Gore & Associates were provided with a separate warranty covering fabric, seam sealing tape and product performance, under the Gore-Tex Guaranteed To Keep You Dry® warranty program implemented in 1993).
Using your WE Backpack
Using Your WE Backpack
Here are the detailed instructions for fitting, adjusting, loading and using your WE Backpack. Given the long hours you may spend carrying your pack it makes sense to spend a little time reading what we have to say. Even if you are happy with the fit and feel of your pack after your retailer's service there may be some points we make here that could add to your satisfaction when you are carrying it.
When you have your pack fully test loaded before a trip, you may need to make some changes. The most important thing is that you have purchased the correct back length in the model of your choice. If you have any doubt about your pack back length or the span of the harness components fitted on your pack, investigate the matter fully before you use your pack. Once it becomes obvious that your pack has been used a straightforward, free-of-charge exchange is difficult.
When you have finished with this page don't forget to read the Backpack Care Advice webpage. Before you head out with your pack also read the Pack DIY repairs page. If you have any problem, for whatever reason, the information provided there could be useful.
The 3 Basic Harness Adjustments and Reviewing Correct Back Length
Nearly all larger WE backpack models use our unique, highly-advanced Synchro-FORM harnesses, the most effective load transfer system available. These packs also come in a choice of back lengths. To confirm the pack you have purchased is the correct size for your torso length, follow this sequence:
Load your pack with at least half the weight you expect to carry and make sure it is also sensibly distributed (see Loading Your Pack, below).
FASTEN THE HIP HARNESS FIRMLY around your hips at the level most comfortable for your particular contours (see more comments below). To carry load effectively on your hips you do need firm tension in the closure strap. To get the hip wings correctly positioned you may need to loosen the main shoulder harness straps and the top stabiliser straps. They should be just loose, not slack. For males, a consistent rule seems to be that the top edges of the hip wings lie level with the hip bones. For females, a little lower than this is often the case. Notice the pulley system for tightening the hip harness straps with an easy pull forward on the tails. You may need to tilt the buckle a little to get the webbing to slide evenly through it.
Next, TENSION THE MAIN SHOULDER HARNESS ADJUSTMENT STRAPS so they just start to take a little of the pack weight from the hip harness. Stop there! These shoulder straps and the shoulder harness top stabilizer straps are made from thicker webbing to prevent any creep through their anchor buckles under load, something you will appreciate greatly if you have used one of the many packs out there that suffer this problem. You may need to tilt the buckles up a little to help the webbing run.
As a note for later, out in the field you will find it an advantage to increase load on the shoulders a little when scrambling or climbing. Even with the Synchro-FORM hip harnesses ability to follow your body movements raising the pack a little will help when it comes to high leg lifts. Also, if your pack is extremely heavy, sharing some of the load from the hips up onto the shoulders will help to reduce the inevitable pressure at hip level caused by such loads. Unfortunately, there is only so much body surface available to carry the load so it makes sense to use it as evenly as possible under extreme loads.
Next, CINCH IN THE SHOULDER HARNESS TOP STABILISER STRAPS so the upper part of the pack's harness panel contacts the upper back with sufficient pressure to just eliminate sideways movement when walking. The three basic harness adjustments are finished!
You can now make refinements to comfort and pack stability by trying different heights and tensions in the sternum or chest strap. Even if you have nearly all the (vertical) pack weight loaded on your hips there is still a need to pull the pack horizontally in at shoulder level (otherwise the pack would simply fall backwards). By tightening the sternum strap you can help distribute this reaction more comfortably over the front of the chest rather letting it simply fall on the shoulders. Finally, test different tensions in the hip wing side stabilizer straps until you find the setting that is most comfortable for you.
Now check you pack back length: Stand sideways to a mirror and look at the level of the top stabilizer strap anchor buckles on the upper part of the pack harness panel, each side of your neck. Compare the buckle level with the top surface of the shoulder harness arms where they pass over your shoulders. If the buckles are more than 10 millimetres below the harness surface level you definitely need the next pack size up. If they are more than 40mm above the pack is too long by one size.
Having a pack that is too short for your torso length seriously compromises the ability to carry load comfortably. One consequence of the short back length is that the natural frame profile will be wrong and will create an excessively large ventilation clearance in the mid-section of the back. The pack weight will be acting too far behind you, pulling back on your shoulders. In combination with this problem, you will be unable to use the shoulder harness top stabilizer straps to effectively steady the pack on your upper back.
A pack that is too long is not so serious. The main compromises will be to 'look-up' head clearance due to the extra frame projection above your shoulders, and to your ability to set the load sharing between hips and shoulders with a simple, bottom-to-top sequence, the basic harness strap adjustments described above.
Note: Active technical daypack models with Synchro-FORM hip wings, the Big Day Out and the Sling Shot, come in only two back lengths, M and L. The shoulder harness design and geometry, combined with the bottom weighted bag capacity permit a wider range of comfortable fit. The top stabilizer anchor buckle height is not so critical.
Checking Hip Wings and Shoulder Harness Spans
Another pre-use check you should make concerns the span of your pack's harness system around your body. Synchro-FORM harness components (shoulder harnesses, hip pads and hip plates) are available in a range of sizes and body face fabric choices. All are interchangeable. If the default components fitted on your pack do not adequately span your hip structure or your torso build, or they prove too long and firm harness adjustment isn't possible, ask your retailer to order exchange components before you use them and obvious wear would make no-cost exchange a problem. (See the section below on removing and refitting Synchro-FORM harness components).
The shoulder harness is anchored at the base of the harness panel, between the hip wings. This is where you can adjust the shoulder harness extension or retraction to adjust for different torso thicknesses. Clearly a thick-set chest needs the shoulder harness extended to a greater length than a slender build torso. Be sure to lock the 50mm webbing strap back up through the 3-bar slide after making an adjustment.
The web page on our Synchro-FORM harness system combined with the bullet-point data on the product pages tell the whole story. Pack back-lengths shown in millimetres against the pack size are a measure of the VERTICAL distance from the top edge of the hip wings (when fastened on the hips) up to the top shoulder stabiliser strap anchor buckles on the pack harness panel, a good guide to choosing your pack size.
Loading Your Pack Correctly
Careful load distribution within your pack bag is the next step in achieving the best possible load carrying comfort. The heavier your pack, the more important this becomes.
Look at the stuff you need to pack. Water, stove fuel, cooking, climbing and ski hardware, tools and some food packages are the heaviest items for their size. Out on the track the density of a tightly packed, wet tent is up there too. Pasta and dried-food packages, clothing and sleeping bags, as well as sleeping pads and empty containers are all lower density items. Here are the rules:
For walking trips pack the densest items closest to your back and just below shoulder level. This level will minimize the forward lean needed to bring the combined centre-of-gravity of you and your pack back over your feet. Pack low-density items away from your back and above shoulder level if necessary. Medium density items are best at the bottom of your pack. A firmly compressed sleeping bag and clothing usually fit in this category.
If you are skiing or climbing the variation is this... Continue to pack the high density items against your back but lower down. This may also include some of the small chunky items you would carry for convenience in the top pocket when walking. These measures will improve your dynamic stability.
Whatever you activity, the idea of hanging a water bladder on the outside back of your pack is absurd. Similarly, back pockets should be used for only the lightest items. Finally, if it's a weekend jaunt and your pack bag isn't crammed to capacity, make full use of built-in compression straps to hold everything as close as possible to your back.
Tuning Frame Shape on High Capacity Pack Models
The large capacity models in the WE pack range use a rugged, asymmetric-cross, internal frame. The special section, high-tensile aluminium bars resist distortion, maintain ventilation comfort and transfer pack load to our sophisticated harness system in the most energy efficient way. The frame stiffness needed to achieve these significant advantages means it is sometimes necessary to customize the frame profile to that of your back. Two main checks and a lesser one will determine if any change is necessary to the standard profile supplied.
The ventilation clearance (from your body to the pack harness panel), between the hip and shoulder harness contacts, should be no more than a hand's thickness. Greater than this will not improve ventilation but it will put your pack load further off your back than necessary. (As noted above, excessive clearance here may indicate that your pack size is too short).
Over your upper back contact area, the frame should lay parallel to your body surface. Insufficient curvature here will result in discomfort on the shoulder blades when the shoulder harness top stabilizer straps are tightened, causing the frame to spring.
A final check on frame profile is to reach forward and down, rounding your back a little, like it would if you were scrambling. This will close the ventilation gap and cause the harness panel to lie against your back between the harness contact areas. If this normal contact is uncomfortable, due perhaps to your particular spinal shape, a little more frame curvature to increase back clearance around the frame cross-over region will overcome the problem.
Disappointing as it may sound, the crudest methods for inducing or reducing frame curvature have proved the most effective. (It is extremely rare that frame bars need to be removed from the pack to get a result). Position the empty pack with the part of the frame bar that needs increased curvature resting over the edge of a bench or table. Small changes can be sometimes be made to both frame bars simultaneously. Otherwise work on bars individually. Lean your weight onto the frame each side of the bend position. Increase the pressure until you feel the metal yield. Making small, incremental changes is not difficult. Flattening bars is easily achieved with hand or foot pressure applied to the frame with the empty bag is resting on a smooth surface.
Harness Refinements
Besides the interchangeability of Synchro-FORM harness components, two further refinements are possible once your harness configuration is established.
Synchro-FORM shoulder harnesses have the built-in facility to change their curvature. If you regularly carry serious loads or have an uneven or out-of-the-ordinary shoulder profile, this will help you. Pack models in our range likely to be used for big trips come standard with three pairs of curved, interchangeable, polypropylene shoulder plates. Our median shoulder harness geometry is designed to conform to a shoulder slope of about 20 degrees. Harnesses come fitted with 20-degree plates which maintain this profile and distribute load evenly over the contact area. If your shoulders are much flatter than this change the 20-degree plates for the straight 10-degree ones. For radically sloping shoulders (well developed trapezius muscles) fit the highly curved 30-degree plates. The plates are a force fit in the fabric pockets. It is easiest to extract them with general purpose pliers. Pushing in the replacements by hand is straightforward.
Synchro-FORM hip harnesses have the facility to limit wing rotation. This is achieved by plugging in a simple link strap to connect the bottom edges of the hip wings. While this removes the wings' ability to rotate independently it does not interfere with their ability to see-saw and follow the normal rocking motion of the pelvis when walking. If you have fairly parallel or straight hips (in this case you are most likely a male) and carry particularly heavy loads, inserting the shorter of the two link straps supplied (M1) will hold the hip harness wings to a typically male curvature. The longer (F1) strap allows the wings to assume and hold a more curved, typically female hip profile. For very fine tuning slightly longer versions of each of these straps, not supplied with the product, are availble on request: (M2) and (F2). To secure the hip wings in the vertical position before consigning your pack to a baggage system simply unplug one end of the link strap. Rotate the hip wings down to loosen the link strap, flatten one of the webbing folded ends and push it out of the rectangular acetal loop. (See also the section below, Trimming for Travel).
Removing and Refitting Synchro-FORM Harness Components
To remove a Shoulder Harness, unthread all straps connecting it to the pack, including the bottom tail anchor down behind the hip harness at the pack base seam (you will need to fold the lumbar flap down). Now pull the shoulder harness webbing tail firmly down to extract the harness arms. You will need to fold the fixed sternum strap parts along the harness arms and help them through the guide tunnels as the harness comes out. Installing a shoulder harness is the reverse process. Reach up under the centre panel and push the ends of the harness arms out through the guide tunnels.
Hip-PADS are removed by sliding/pulling them off their Hip-PLATES. Remove the 50mm buckle components from the closure straps. Disconnect / manage side stabiliser straps as required. The Lobe region of the Hip-PLATES and Hip-PADS connect together using either touchtape contact patches or touch-tape flaps (on more recent hip-PADS). Separate the hook and loop parts then slide the pads off the plates. When refitting pads make sure the Hip-PLATES are fully inserted into the fabric cup on the back of the hip-PAD. (On touchtape contact patch versions it is helpful to insert pieces of cardboard to keep the touchtape apart until positioning is correct - when the touchtape patches overlap exactly). Once the hip pads are fitted reach in through the hip-link strap apertures at the back, near the bottom, and hook out the 20mm rectangular loops. Plug the appropriate length hip-link strap.
Only in the case of needing to fit a small Hip-PLATE should you ever have to remove one. To do so, first remove the Hip-PADS then unscrew the 5mm countersunk-head screws that attach through the plates, the pack bag eyelets and into the frame system. Apply firm downward pressure on the #2 cross-recess screwdriver before starting to unscrew. The screws are coated with Loctite 222 (hand tool strength) thread-locking compound. This, or an equivalent low-strength compound available at any good hardware store, must be used when re-fitting screws. A rubber washer is fitted between the Hip-PLATE and pack bag and on recent packs a wide-flange, countersunk stainless steel washer is also fitted between the screw head and the plate eyelet. Do not forget to refit both these components. (Screws, rubber washers and stainless washers are available on request. The stainless washers protect the eyelets from any possible long-term damage. Email us and we can post any of these components to you. Inside the pack, the Hip-PLATE screws fix into nuts riveted firmly into the frame system. On older packs it is possible that these may turn when you try to remove the screws. If you have any problems with Hip-PLATE fixings contact your retailer or the Sea To Summit service department.
Preparing Your Pack for Baggage Systems: Trimming-for-Travel
If you travel with your WE back-country pack model (rather than a Frontier or Ladakh which have harness cover panels built-in) you can still secure the harness system and eliminate snag hazards when your pack goes onto a baggage conveyor. This is a really neat aspect of the WE Synchro-FORM system. Simply loosen the hip wing side stabilizer straps to the maximum, unplug one end of the hip link strap if it's connected, and rotate the hip wings into the vertical position. Loosen the hip harness buckle straps to the maximum, pass one end around the grab handle at the top of the harness panel, close the buckle and re-tighten the straps. The hip harness components are now firmly within the general shape of the pack bag.
Now tighten the shoulder harness top stabilizer straps as far as they easily go. Then fully tighten the main shoulder harness straps to tension the shoulder harness down on the pack harness panel. Wrap the long strap tails under the hip wings and loosely knot them. Fasten the sternum strap over the ends of the hip wings. Finally, tuck in any remaining loose webbing tails.
We are also in the habit of threading the webbing tails on the main top cover straps through the rectangular loops above the side release buckles on the top cover rim. Then you can make some half hitches around the SR buckles with the tails and finish by tucking them up under the cover rim. You have now guarded against your pack appearing at the other end of your journey with a broken SR buckle and made it inconvenient to open the top cover.
Brand: | |
Product Category: | |
Colour: | |
-
Sold Out
Your Price $13.99
-
In Stock
Your Price $84.15
-
In Stock
Your Price $84.15
-
In Stock
Your Price $50.44
-
In Stock
Your Price $50.44
-
Special Order
Your Price $54.00
-
Special Order
Your Price $52.20
-
In Stock
Your Price $54.00